On Datarmor
Prerequesites
You need to have an account on Datarmor, that will provide you with
extranet logins (username + password)
intranet logins (username + password)
Besides, you need to be affiliated to our unix group named gosmose. To get an account, please contact your IT assistant if you are from an institute partner of Datarmor, otherwise please contact Dorian Cazau to see how you could join OSmOSE team!
You can now access Datarmor through two different ways, with a command line interface described in SSH connexion or through a jupyterhub session described in Jupyterhub.
Warning
In case of a first connexion, you will have to pass through the SSH connexion first before you can use the jupyterhub of Datarmor.
Jupyterhub
Getting started
The jupyterhub of Datarmor is directly reachable via this portal. Once you are on the Portail Domicile Ifremer (see Jupyterhub) after entering your extranet logins, click on JUPYTER, enter your intranet logins when asked and click on Start My Server.
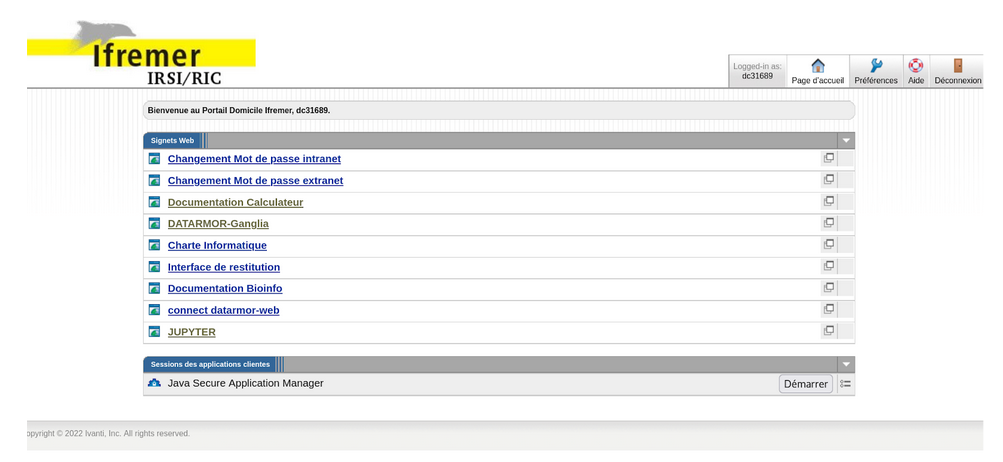
Figure : Portail Domicile Ifremer
You will then have to select a job profile, which will allocate to your jupyterhub session different amount of computer resources. By default, we recommend to use Datarmor - Jupyterlab - 8 cores, 32 GB RAM, 2 hours (quite equivalent to a personal computer).
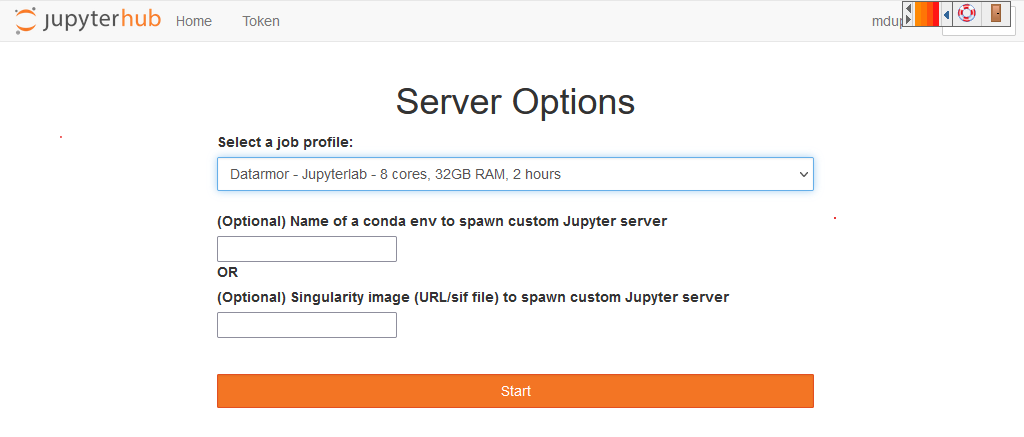
Figure : Selection of computer ressource
You are now on the Jupyterhub of Datarmor!
Warning
- Some things to check and keep in mind
Do not use the jupyterhub session to download or upload high volume data, only a few small files
Be aware of your computational resources, and avoid overusing them (this will crash your kernel) ! Conversely, avoid underusing your notebook, especially do not forget to close your notebook session once you are done (see Step 3)
Often check that you do not have several jupyterhub sessions running simultaneously (use qstat and qdel, please refer to the Glossary)
In case of connexion issues, please report it to Dorian Cazau and contact the assistance at IFREMER.
Use the toolkit through notebooks
Our toolkit has been made accessible through user-friendly notebooks covering different basic use cases (eg build a OSmOSE dataset) and more advanced applications (eg workflow for weather estimation), which have been presented in this documentation in Basic use case and Advanced use case. These notebooks are available on a Github repository You will have to make a copy of them into your personal workspace.
To do this, you can use a FTP application such as FileZilla or WinSCP to transfer the folder to your personnal workspace.
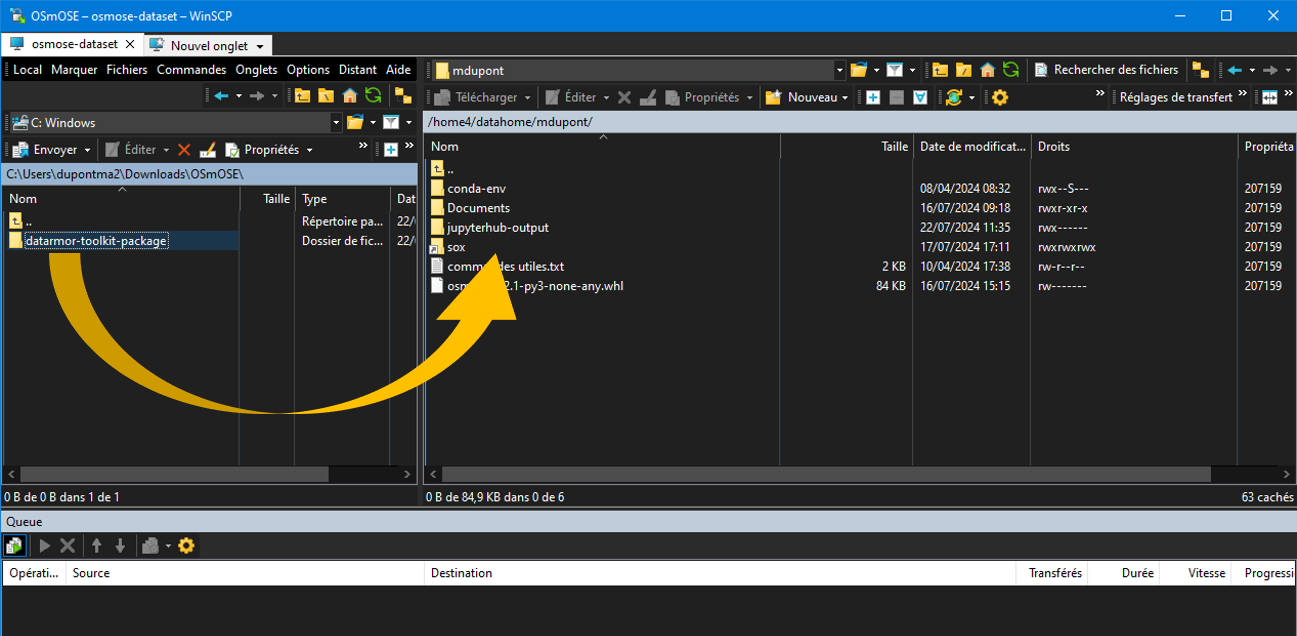
Figure : Folder transfer from personnal computer to Datarmor personnal space
Another way to proceed is to import the zipped folder directly from you Jupyterhub session
On your jupyterhub session, click on upload and select the zipped folder
Open a terminal console from your session -> New -> Terminal
Unzip the content of the zipped folder with the following command:
unzip archivename.zip
Note
For all bash commands here, it is required to activate a bash shell from your terminal console with the following commands
bash
. /appli/anaconda/latest/etc/profile.d/conda.sh
To open a notebook, just double click on it. If your notebook kernel is different from osmose, change it in Kernel -> Change Kernel -> Python [conda env:osmose]. This is the latest stable version.
Use OSmOSE conda environment
In order to use the latest stable version of our toolkit, it is recommended that you use our conda environment. To do this, check that your condarc file in your datahome contains the following elements (run cat .condarc)
envs_dirs:
- $HOME/conda-env
- /appli/conda-env
- /appli/conda-env/2.7
- /appli/conda-env/3.6
- /home/datawork-osmose/conda-env
If different, edit this file to insert those elements, especially the latter element (run vi .condarc -> i to enter edition mode -> insert the elements -> :x to save and quit.
Verify that the conda environment is present in the conda-env folder (in your datahome) ; running the command conda info --envs should give you for example
                      /home/datawork-osmose/conda-env/mmdetect
                      /home/datawork-osmose/conda-env/osmose
osmose_dev_dcazau    /home3/datawork/dcazau/conda-env/osmose_dev_dcazau
Shut down your jupyterhub session
Once you are done with your work, please follow this procedure to close your session : on the Jupyterhub main page -> click tab Running -> click on all Shutdown then click on the button Logout on the Jupyterhub main page.
SSH connexion
This connexion will require to reach the extranet of Datarmor first, which can be done using a VPN as described in this document
SSH connexion is then straightforward and you should get the screen showed in Figure : Console screen after SSH connexion with the following command
ssh <intranet_username>@datarmor.ifremer.fr
Note
You can a SSH client such as PuTTY to establish a SSH connexion

Figure : Console screen after SSH connexion
Warning
In case you happen to be on the intranet network of ENSTA Bretagne, IMT Atlantique or UBO, run instead
ssh <intranet_username>@datarmor
Once you are here you can check your unix group to be sure it is gosmose using the bash command groups. Be sure gosmose appears first, a second groups (for your own institution most likely) might be present but must come after gosmose.
Conda environment creation
Below are listed the steps to create and build a conda environment that will be available in your Jupyterhub session. Note that there is possibly a delay between the creation and disposal of your environment.
Requirements
Please first connect to Datarmor via SSH connexion. Once you are in your datahome, check that your condarc file contains the following elements (run cat .condarc)
envs_dirs:
  - /home/datawork-osmose/conda-env
  - /home3/datahome/dcazau/conda-env
  - /appli/conda-env
  - /appli/conda-env/2.7
  - /appli/conda-env/3.6
If different, edit this file to insert those elements.
Procedure for conda environment creation / modification
Note
We have made a tutorial on Conda if you are starting with it
Launch an interactive qsub job following the procedure described in Launch a qsub job. Be careful of the memory asked, package installation might need memory higher than the default 500 MB
Activate conda commands in a bash shell
bash
. /appli/anaconda/latest/etc/profile.d/conda.sh
Create your ENV_NAME conda environment, for example here in the version python 3.10
conda create --name ENV_NAME python=3.10
Note
By default on Datarmor, this command will create an environment in your local home directory (of the form /home3/datahome/dcazau/conda-env), making it only usable by yourself. In case you would like a conda environment usable by the OSmOSE group, you will have to change your environment location by setting the parameter -p
conda create --p /home/datawork-osmose/conda-env/ENV_NAME python=3.10
Note that this is mandatory in case you want to use your conda environment within pbs jobs, through the argument env_name of method jb.build_job_file. If you had already installed a conda environment in your datahome and you want to use it in the datawork-osmose, you can use the clone command as follows (for example here for the environment osmose_stable_test)
conda create --prefix=/home/datawork-osmose/conda-env/osmose_stable_test --clone /home3/datawork/dcazau/conda-env/osmose_stable_test
Warning
Reported bug : changing python version will need to set the environment path with -p, otherwise it will be installed in /dcazau/$Datarmor/...
Verify that your conda environment is present in the
conda-envfolder (in your datahome or your datawork directory) ; running the commandconda info --envsshould give you for example
                      /home/datawork-osmose/conda-env/mmdetect
                      /home/datawork-osmose/conda-env/osmose
osmose_dev_dcazau    /home3/datawork/dcazau/conda-env/osmose_dev_dcazau
Warning
Note that your new environment should also be present in ` .conda/environments.txt` ; if not add it manually in this file, making sure to end the environment path without a `/`
After activation of your environment, install the package
ipykernelto be able to see your environment in the kernes available in jupyterhub
conda install ipykernel
In case you created an environment in the
datawork-osmose, do not forget to change its permissions so it can be read and executed by any member of OSmOSE
chmod 700 -R /home/datawork-osmose/conda-env/ENV_NAME
Going further with jobs
Launch a qsub job
Note
We have made a tutorial on Conda if you are starting with it
You can now create a job to ask for resources (including internet access) using the qsub command, for example
qsub -I -l walltime=1:00:00 -q ftp -S /bin/bash
This job is interactive (parameter -I) and will last for 1 hour (parameter walltime=1:00:00). Interactiveness means standard inputs and outputs (stdin, stdout, stderr) are redirected to your current terminal session and, as a result, you can have direct feedbacks of your job execution. Default memory resources are limited to 500 MB, you may want more resources to install package in conda environment (as we will see in Conda environment creation) ; to change this use the mem parameter:
qsub -I -l walltime=1:00:00,mem=4G -q ftp -S /bin/bash
See section Run python codes in interactive qsub jobs for other configurations of qsub jobs.
Run python codes in interactive qsub jobs
Let’s start launching an interactive qsub job:
qsub -I -q mpi_1 -l select=1:ncpus=28:mpiprocs=28:mem=120gb -l walltime=01:00:00 -S /bin/bash
source /appli/hibd/rdma-hadoop-2.x-1.3.5-x86/sbin/quick-hadoop-get-env.sh --conda-env osmose
You can now run python scripts, eg essai_save_image.py located in /home/datawork-osmose/, as follows
time python3 /home/datawork-osmose/essai_save_image.py
To run your code using a GPU
qsub -I -q gpuq -l ncpus=10 -l ngpus=1 -l mem=32gb -l walltime=01:00:00 -S /bin/bash
Run python codes in batch qsub jobs with a PBS file
Batch jobs enable to launch a script in background, unlike the interactive mode.
To ease its deployment, you may first want to create a PBS file (written in bash), for example considered a file job.pbs defined as follows:
#!/bin/bash
#PBS -q gpuq
#PBS -l ncpus=10 -l ngpus=1 -l mem=32gb  -l walltime=01:00:00
#PBS -S /bin/bash

# we move to the directory where the PBS file has been called thanks to the special variable PBS_O_WORKDIR
cd $PBS_O_WORKDIR/

# we load a conda env
. /appli/anaconda/latest/etc/profile.d/conda.sh
conda activate ENV_NAME

# we launch our script, redirecting the output to a file to get feedbacks from its execution
echo "starting script execution..." &>> log.txt
python3 /home/datawork-osmose/essai_save_image.py &>> log.txt
You can now simply run this code by entering the following line in the terminal:
qsub job.pbs
Your code is now running. To monitor its execution, consider reading the log file (log.txt in the example). To learn about its general state, consider the following command:
qstat -u intranet_username
The results show your current jobs as well as their status (Q means queued, H held, R running, E exiting. Please refer to the qstat manual for more information).
Develop and contribute using github and poetry
Although Datarmor should not be used as a development environment, step 4 from our github-based contribution workflow described in Contribute may include a few specific developments regarding features only available on Datarmor (typically everything related to distributed computing). The installation procedure described in Installation with github and poetry is still valid, just considered your Datarmor datahome as your local working directory ; just be cautious with the Conda environment creation on Datarmor, better you read Procedure for conda environment creation / modification if it is your first time.