Import annotations
Terminology
Annotation
It defines the assignment of a label in a specific segment. The annotation can be represented as a box within the segment (i.e. strong detection). It is drawn by the user and must frame the sound of interest. Another possible representation is the presence of a sound of interest in the whole segment (i.e. weak detection). In APLOSE, the annotator can also leave a comment and/or express its confidence on any annotation.
Annotation Campaign
A campaign refers to the annotations of a dataset with a defined set of labels and tasks. Each campaign is defined by a name, a dataset and spectrogram configurations. A campaign is made up of phases.
Annotation Phase
A phase characterises the work carried out on a campaign. There are two types of phase:
- "Annotation": This type of phase is used to make an initial annotation of the campaign, based on empty spectrograms. This type of phase can also be used to import external annotations, for example from automatic detectors.
- "Verification": Verification phases are used to validate/invalidate annotations made in the “Annotation” phase. If a user is assigned to both phases, he will not be able to validate his own annotations.
The two phases can take place simultaneously.
You may want to verify annotations from a automatic detector for exemple.
From an "Annotation" phase, you can import new annotations with the import button:

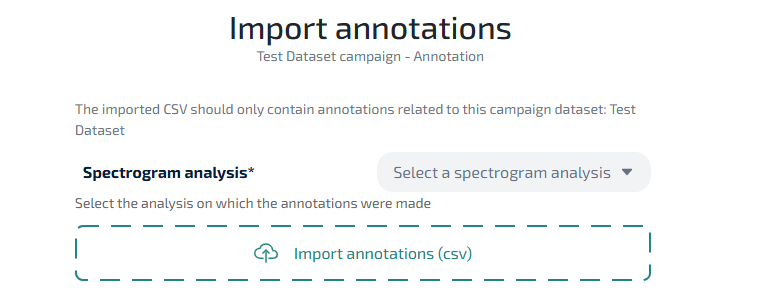
Select an analysis
If your campaign has more than one analysis, you must select the analysis on which annotations were made.
Upload a CSV file
You can either click on the "Import annotation" zone or drag a file in it. The file should be a csv with the following columns:
| Column | Type | Description |
|---|---|---|
| dataset | string | Name of the dataset. If it doesn't correspond to the campaign dataset, you will have the choice to keep it or not |
| start_datetime | timestamp | Start of the annotation |
| end_datetime | timestamp | End of the annotation |
| start_frequency | int | Lower frequency of the annotation |
| end_frequency | int | Higher frequency of the annotation |
| annotation | string | Label of the annotation |
| annotator | string | Detector or annotator that created the annotation |
| is_box | boolean | Either the annotation is a box or a weak annotation |
| confidence_indicator_label | string | The name of the level of confidence (if exists) |
| confidence_indicator_level | string [int]/[int] | The level of confidence on the maximum level available (if exists) |
In the case of weak annotations, start/end datetime and start/end frequency should be the ones of the file.
Configure detectors
After submitting your file, you will need to configure the detectors as they will be saved in the database.
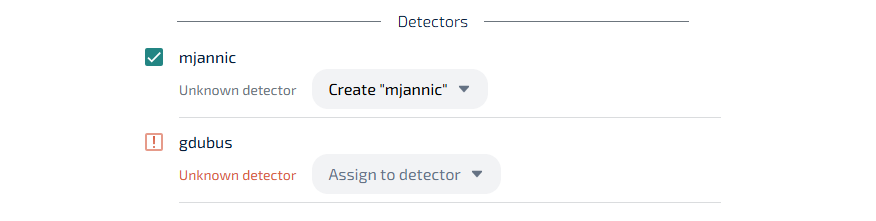
You will be asked to assign the CSV detectors to an existing one or to create a new one. Here you can also select only the detectors you want to check, in case the file contains multiple ones.
You can then specify each detector configuration (existing or new one).

Submit
When you're done you can click on "Import". The upload will start. It will be split in chunks of 200 lines to easy large file import. You can follow the progression and an estimated remaining time is given.
INFO
If you encounter an error, reset the import and load a corrected file. The annotations won't be duplicated.